Monday, December 11, 2017

Clolour Blast - Minted Complete

What I love about artistic collaborations is seeing everyones take on a theme. And having all those ideas in one place is such a bonus.  Even something as simple as one color can have so many variations.

My Minted journal came back to me at the end of August and I've been loving it ever since. It's lovely to think that this little journal traveled all over Europe and even to China and I can't thank my fellow collaborators enough for putting their art into it.       


Seriously, it's a little book of amazingness. We're all sharing our completed journals, so be sure to check them out one last time!


Thursday, November 16, 2017

Colour Blast - Orange

It's sad to think that this Colour Blast collaboration is now over. I really loved getting each journal when it was at a different stage, from being the first to add to Vanessa's Grey journal to being the last to add to Julia's Orange. We only have our competed original journals left to share.


 I added this drawing and mantra onto a background that was already in the journal. I'm assuming it was made by Julia. I love these inky backgrounds she makes, so I didn't want to totally cover it. 


I sketched some tiger lilies a few years ago and when I found the drawings, I made copies to use. Here I transferred the image onto a piece of tissue paper I had glued into the journal. 


I was so happy when Julia picked orange as her color. Along with yellow, orange is a happy color for me, but one with extra depth. I also consider it a brave color to use. 


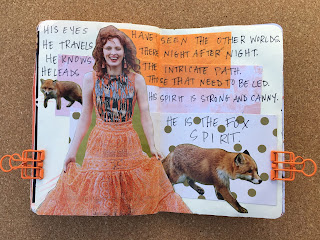
This spread I made for Julia and her Fox spirit!


I still had Julia's journal when we had the solar eclipse in North America. While I wasn't near totality here in New York, I thought id be interesting to capture how the sun looked at a certain time on that day. I'll always remember how the sun glowed. 

I also love that on the last page, we all added which month we worked in the journal. What a great to close it out.  I can't wait to see how everyone's final pages before we share our own completed journals. Please check out everyone else's pages: Julia, Vanessa, Lauren, Riet, Moriah and Lauren.


Tuesday, October 17, 2017

Printing with Foam Plates

This is just a super casual tutorial for using foam printing plates. I first came across these plates in collage, as a kid friendly introduction to printmaking. The brand I'm using is Inovart and you can read more about their Presto Foam Printing Plates here. What I love about them is all you need to make your impression is a pencil. I even tried using the handle of a palette knife, so you don't have to worry about sharp carving tools. 


I'm using water soluble print ink from Blick and Speedball. Water soluble ink makes for easier clean up and a faster dry time than oil based printing inks. Besides the drawing utensils you'll also want palette paper, to roll my ink out on, brayers and some paper to print on. A scissor is also good to cut down the plates and even cut them into shapes. 


I started by first brainstorming some shapes that I might want to "carve." Think about repeated symbols that show up in your work. This would be a great way to make a plate that you can reuse with those images. Also magazine images of faces are great too.


For using the magazine image, the carving process is basically just tracing. You can see my first tracing in the middle and I just decided to retrace it to thicken and deepen the lines. This step may have been unnecessary because you'll see that even the slight crease in the foam ends up getting printed, so you really just need the lightest indentation.


Since I have two brayers, I made sure to use one for ink and the other to burnish. 


And here's the first print!  You can see that all the details come through and honestly I was surprised with how clean the image came out. 


I made three more plates and this time I drew directly into the foam with pencil. I also used the handle of the palette knife on the eye, and you can see the lines are thicker, but also not as clean when printed. But I ended up going back over that one to deepen the lines. 


These plates are also great for making collage elements as they are great to print on a variety of paper. Here I printed on tissue paper, marbled paper, old book paper and some mixed media paper that I had color swatches on. 


And again because the ink is water soluble, the plates are easy to clean and reusable. 


Also don't forget to print directly into your journal! This is a great way to play with layers and repeated imagery. 

I'd even try this technique out with kids fun foam, which then might be printable with stamping ink. 

I'm so glad that I held onto these foam sheets. I can see myself making a lot of theses plates. They are easier to carve than stamps, but can be thought of the same way. I love how imperfect the line quality is versus manufactured stamps. And more importantly, how personal they can be. 


Monday, September 18, 2017

Colour Blast - Yellow

I've always loved yellow. It started as my go to "pick me up" color, and has become a staple in my palette. And working in Riet's journal made me love it all the more.


I've really come to enjoy using this technique for using up my scraps. Especially scraps of hand painted paper. Though simple, it definitely adds a lot of energy. 


Days, weeks, and now months after I made this spread I still scroll back into my camera roll to look at this spread. It's has to be one of the spreads that I'm most happy with. Everything just flowed while making this one. 


I had three bottles of yellow paint laying on my desk and decide to swatch them all! Yellow is really lovely and fun. 


I'm  always looking up color/emotion associations. So I paired them with a photo I had taken at the New York Botanical Gardens. 


We're getting to end of our Colour Blast journey. Most of the journals have completed the circle and we have just one more color to share. Be sure to check out all the other additions added this round by Vanessa, Riet, Lauren Brown, Lauren Blood, Moriah, and Julia

Tuesday, August 15, 2017

Colour Blast - Red

The Colour Blast collaboration took a little break because we had quite a few members traveling this summer. It was fun watching everyone's adventures, but now I get to share my pages in Moriah's Red Journal. Just a reminder, the others artists in the collab are Vanessa, Julia, Lauren Brown, Lauren Blood, Riet and Moriah.

My relationship with the color red has had an interesting journey. I used to stay far away from it. I saw red as this loud, in your face color, when all I wanted to do was go unnoticed. I saw it as the color of strength and being in charge during a time when I didn't feel strong or in control. Not until I started to study the Chakras did my attitude toward red change and a true appreciation and love for it come forward. Now I associate red so strongly with my Root Chakra. It's become my grounding color. The color I use when I need to be reminded of my place, that I have a place, and my personal power. The color that proves I'm a woman and connects me to the women of my past. My mom has always loved the color red.


So I wasn't at all surprised when these spreads started to share the theme of self love and acceptance.

Friday, August 4, 2017

Favorite Flower Collab - Lilac


One of my creative goals for this year was to participate in more collaborations. Partly because Get Messy has such an array of talented artists and because I wanted to open myself up more and be more sociable. 

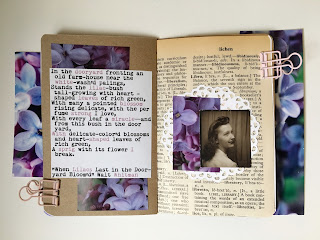
This collab is with Caylee and Essie and all about our favorite flowers. Mine, as you can see, is the lilac. We have one in our backyard, and every year I just keep waiting for it to bloom and add to my lilac photo album. 


I took apart a small Moleskine cahier and added a variety of papers for everyone to use. I never know how much insight into the pages I should share. I sometime want to share my entire thoughts behind a spread, but I also realize and appreciate that everyone can have their own interpretation. So I'll just leave you with the images this time.


Wednesday, July 19, 2017

DIY Watercolor Pallette

I love using watercolors but I've found that I keep reaching for my pan watercolor sets because they are so easy to use. This meant that this pile of watercolor tubes was getting neglected and I can't have that!


While I already have premade pan sets, I liked the idea of going through my tube watercolors and making a palette of my favorite colors. I bought this Meeden palette with 24 half pans, because I didn't want to limit my colors. 


I first narrowed down my colors. I found that I have double of a lot of these Grumbacher tubes, which means I never checked my supplies before buying the set again... While these are student grade paints, they do make up the bulk of my basic and traditional colors. I choose Grumbacher Sap Green, Viridian, Thalo Blue, Ultramarine Blue, Burnt Sienna, Yellow Ocher Hue, Yellow Pale Hue, Cadmium Yellow Deep Hue, Cadmium Red Light Hue and Alizarin Crimson. 


I had a few more blues and reds of these Winsor & Newton tubes, but narrowed them down to these favorites. These are Winsor & Newton Ivory Black, Winsor (Dioxazine) Purple, Manganese Blue Hue, Quinacridone Red, Opera Rose, and Permanent Rose. 


Daniel Smith! I totally splurged on these. I bought the Quinacridone Gold and the Primatek set, which is made of Piemontite Genuine, Hematite Genuine, Mayan Blue Genuine, Jadeite Genuine, Rhodonite Genuine and Amethyst Genuine.


I had previously switched out all these colors, so I used those to make a master swatch set in my Get Messy Season of Colour journal. 


Once I had the colors in order I gave each tube a half pan and wrote the name of the color on the side of the pan.


This way, if I ever need to refill the pan, I know the color!


I found the paint came out much easier when I held onto the end of the tube and pushing the paint into the corner of the pan. 


I went around filling the pans this way until almost full. I wasn't concerned with fully filling the pans or making them perfectly flat on top. 


The process went by pretty quickly once I got the technique down. It was interesting to make note of which colors where more thick in consistency and I wonder if it has to do with the pigment used. 


I noticed some pretty quickly stated to dry on the top, especially the Daniel Smith ones. I'm letting them dry in the palette because I don't want to worry about dust drying on top. 


Once I had my pans filled I spent some time color mixing. The page on the right is figuring out the debate between the traditional primaries of Yellow, Red, Blue or the primary set our printers use, Yellow, Magenta, and Cyan. The Yellow for both sets is Grumbacher Yellow Pale Hue, the Red is Grumbacher Cadmium Red Light Hue and the Blue is Grumbacher Ultramarine Blue. For Magenta I used Winsor & Newton Permanent Red and Cyan is Grumbacher Thalo Blue. 

I first did a straight mixing of the primaries going across and then mixed the secondary colors as well. The YMC primaries defiantly give you the brighter, more traditional secondaries and it was interesting to see just how different they are. 


This will probably become the set that I travel with. I can even add some more half pans to the center if I ever pick up some more tube paints. 

Tuesday, July 4, 2017

Floral Collaboration Journal

It seems like every year I judge the passing of time by what flowers are blooming. Crocus in February, lilacs in April, irises in May, lilies in June and July. Our hydrangeas and roses start in June and can bloom all through November. So when Flowers was agreed upon for a new collaboration art journal, I was so excited to get started.

Today I'm sharing the cover of a new journal and my inside spread. Honestly, I never know what to do with art journal covers, so I treaded this one like it's own spread.


These are both using images I've been holding onto. I found the girl in the floral dress and what better than to just surround her in flowers and add a quote from The Secret Garden.


This journal is now with Julia and then will be on it's way to Alicia and Marie.

Wednesday, May 17, 2017

Get Messy Contrast - Weeks 4-6

The end of Season of Contrast turned into a surprisingly creative three weeks. I got inspired by some quotes and the great tutorials, so I really enjoyed making these spreads.


This spread (above) was made during a Get Messy Google hangout where we played a roulette style game to see what we were going to do next on the page. It was so much fun and I was so inspired, that the following pages were all made the same day using that creative energy. 


Now that we have a few weeks break between seasons, I have some old books I want to take apart to make in journals and during one sunny weekend I want to marble a ton of paper outside.